Friday, April 27, 2018

Resetting Service Requirement: Oil, How to reset the change oil warning

Resetting Service Requirement: Oil
How to reset the change oil warning

It's happened to all of us, we finish replacing the oil in our car and you are ready to move one, but then you remember you have to reset the computer in the car to tell it that it now has fresh oil.

This is the procedure:
-Close all doors. Switch Ignition ON

-Make sure lower display in cluster show clock and mileage.

-Press and hold trip odometer reset button for about 5 seconds until CBS icon begin to display in cluster.   Release button.

-Press turn signal lever BC button (arrow) repeatedly to scroll through CBS icons.  Find the oil symbol.

-For each icon the word RESET? is displayed. To reset a particular item, press and hold BC button.  A small analog clock icon is displayed.  When complete, then chosen CBS item is reset.

-To insure that the reset was done, press BC button while looking at CBS reset icon.  Acknowledgment of reset is shown with a check mark in a box.

Engine oil Capacity: 6.5 liters (6.9 US qt)
Keep in mind you never remove all the oil from your engine when change the oil.  The engine will always retain a bit of oil inside.  Warm up the engine before you remove the drain plug, this will help the oil come out.  The oil is more liquid when it's warm.

I use: Mobil 1  5W30

How to add oil:

The way I do it is, I add 4 to 5 quarts and then turn the car on, and 
I check how much oil the car has, then I add more as needed.  You will need to wait about 5 minutes for the car to read the oil level.  I never add 6.5 quarts to my car.

Tip:  When you check the oil level the very first time after changing the oil, and you turn your car off....  and you add more OIL....  Don't trust the level of the oil when you turn the car ON again.  you will need to drive it a bit for the "real" level to appear.  In my experience the level doesn't settle until you drive the car a bit.  Sometimes I think it's full but it's still not "full", until I check it a third time, after I drove the car. 


Happy Vanos... Happy Car
Vanos
The E90 330i 2006 prefers for the oil to be at MAX level.  Why?  Because the Vanos require a ton of oil to function properly.  If the Vanos are happy your car will run better.  Just my personal experience.   I made an article about cleaning the vanos, I will include a link below, it has A TON of info on VANOS:

https://msauceda1.blogspot.com/2014/10/vanos-service-with-instructions.html


The car will tell you when it's time to replace the oil
The CBS system recognizes when a service is required.  The Oil change interval is determined by engine oil condition sensor (OZS) monitoring oil condition, oil level, and oil temperature; and from additional algorithms using these parameters: Engine load, fuel consumption, time and distance since the last oil change.

Definition:
CBS: Condition Based Service (CBS)
OZS: Oil condition Sensor
Vanos: Variable camshaft timing solenoid


Oil Filter:
Always replace the oil filter at the same time you replace the oil.  Note that the Oil filter "KIT" comes with two "O" rings, one is big and it goes around the Oil housing, and the other is a small one.  The kit also comes with 1 crush washer, you have to replace these too.
Intervals between oil change:
I don't wait the "15K miles or 1 year" BMW oil change interval indicated in the car.  MAX i go 6 months, usually 5 months.  To be honest some time I do go close 15K miles, but then I have to add oil to my car, and then I get problems with the Vanos, and then I have to take out the vanos to clean them.  I have another blog where I show how to do this, link above.  Just change the oil every 5K miles, your car will reward you for it... 
To remove oil filter cap


Oil filter Cap removal tool

You will need one of these to remove the oil cap.  I have no affiliation with these
Amazon link at end of article...


NO Dipstick
I know... It's sad.  But this car doesn't have a tradition dipstick, to check the oil, you have to go inside the car and check oil level in the cluster.  The car has a sensor that tells it how much oil is the car.


BMW E90 330i 2006 


I hope you found this information useful,

See more, to go the main page: Blog Main Page

If you found the information helpful consider donating:


Oil filter cap removal tool:


E90 Oil filter kit

Wednesday, April 25, 2018

P0341 Camshaft Position Sensor "A", Bank 1


P0341 Camshaft Position Sensor "A" Circuit Range/ Performance (Bank 1 or Single Sensor)

BMW E90, 330i 2006

So I got up this morning and turned on my car, and my car took about 5 full seconds to turn on, the starter kept going until finally the car started, unfortunately it started very rough, now in it's defense I did drive it hard about 3 days ago and I parked it, so it was the first time since then that I started it.

But the car barely started, and then it was sputtering, barely staying on.  So I decided to check for codes and I got P0341.  Now I've replaced the sensor before about 5 years ago, so I figured well maybe they only last 5 years.... But it was NOT the sensor that was bad let me explain...

Symptoms:
Rough Idle, P0341 code, Low Oil, and recently replaced oil and "dirty Vanos".

This is what I did to fix it:

First: Cleaned both Intake and Exhaust Vanos:

This is how to clean the Vanos

Both Vanos, Intake and Exhaust.
Remove with 10mm socket and they pop out.  

Camshaft Sensor is on the right of the solenoids

To give you more room to remove the Vanos, remove the snorkel in top of the Radiator
VANOS: Both look the same, they are in fact exactly the same
Second: Added oil (1 Quart) 
Oil is Mobil 1: 5W30, this is 5 quarts, only add 1 quart, that will do it.

About the Oil Level...
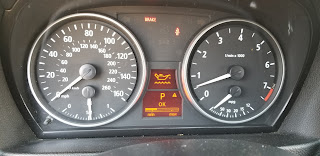
PICTURE 1   :   Oil level is 2 blocks or Min.
PICTURE 2   :  Oil Level reads just above minimum, but still says OK on the display
Low oil check, with On Board Diagnostics, now note they both say OK, Picture 1 and Pictures 2... but in fact it's low, the E90's don't like it when you have the minimum oil level, it just runs better full, the Vanos are happier with MAX oil level, not OK level.  It has been my experience that the vanos stick when they have OK oil level, if they have MAX oil level they run better.
This is what you want to see.  All green bars full to the top
Third: Then drove it for 5 minutes, then code disappeared.


Why would this happen:

This is something I've noticed on my car, I am not sure if it happens to other people but I've noticed that if I don't replace the oil regularly and then I replace it,  YES, AFTER I replace the oil...  soon after I have sticking "VANOS" Solenoids, not sure why, but it has happened lots of times now, and I remember that each time I went 15K before replacing the oil... Now don't chew me out for not replacing the oil sooner, I know I should replace it ever 5K at least, but sometimes it's just not possible, I've had my car for a long time, and I know all the symptoms and quirks, like Doug De Mouro says...

I know the clearance on the Vanos is very tight, a very small amount of "paper" or "plastic" or "dirt" will bind the solenoid and it won't move, which is why you get the code for bad solenoid, technically it's correct, in that the vanos is stuck, but it just needs to be cleaned.  I have a few articles on how to clean the Vanos, I'll include a link:

https://msauceda1.blogspot.com/2014/10/vanos-service-with-instructions.html

If you must replace the sensor:  .... do this

If this doesn't fix your car, then you probably do have a bad sensor, this is where it's located:

Sensor on the right:  Camshaft Position Sensor "A", Bank 1 "intake"

It's very easy to replace, and you can get it here from Pelicanparts.com:
E90 Camshaft Position Sensor "A", Bank 1, Website link
www.pelicanparts.com  Picture of Sensor Camshaft Position sensor, bank 1
I am not affiliated with Pelicanparts.com, but they always have what I need, and they alway have useful pictures with good detail on how to repair my car, I always use them...


E90 2006 330i  with: 220K  so far...


I hope you found this information useful,

See more, to go the main page: Blog Main Page

If you found the information helpful consider donating:


Follow me on Facebook


Tuesday, April 17, 2018

OBD Code Definitions (ALL) BMW

On-Board Diagnostics Trouble Codes (DTCs)

If you ever wanted to know what each OBD code stands for, here is the list:

Just like many of you I do most of the work on my E90 330i 2006 BMW myself.

If you have a code you want to look up, this is the entiere list of all the codes:

These codes can be checked with an OBDII reader.  Here is a link to the one I use:
https://msauceda1.blogspot.com/2015/06/how-to-read-codes-in-your-e90.html


Click the image to enlarge:

P3205 - P3284

P3102 - P3202

P2403 - P3101

P2188 - P2401

P1660 - P2187

P160B - P166F

P1576 - P160A

P1503 - P1567

P1424 - P1502

P1342 - P142F

P1191 - P1328

P1123 - P1190

P1047 - P1122

P0646 - P1041

P0463 - P0645

P0335 - P0462

P0243 - P0332

P0159 - P0238

P0A16 - P0158

P00B2 - P0A15


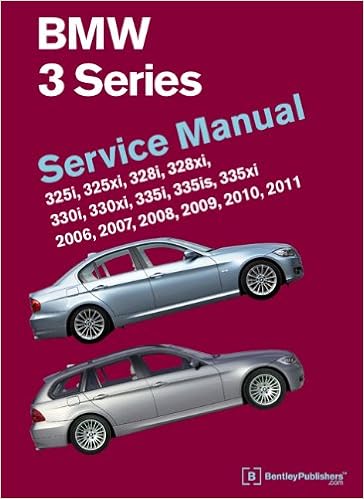
I would like to Thank Bentley Publishers for providing the information I posted here, this is all in the book

BMW 3 Series Service Manual


I use this book a lot!


I hope you found this information useful,

See more, to go the main page: Blog Main Page

If you found the information helpful consider donating:


E90 BMW Recalls, My Experience: Airbag, Blower Motor

Airbag Recall: 
New Airbag E90 330i 2006


Let me start by saying that I never experienced anything weird with the air bag, but I don't think I was supposed to, I think the problem is when the airbag deploys that it could cause damage to the driver.  None the less I was happy to get it replaced.

NO appointment: bad idea...
I just showed up at BMW El cajon, CA.  I didn't have an appointment and they told me I had to call the "appointment center" to be seen, so I went home and I made call, they told me the next day was available so I went in this morning... It took 3 hours to get it replaced.  Initially I was told 1.5 hours, but let me explain why I was okay with it.

They also inspected my Blower motor wiring, which is the 2nd recall I knew about that I wanted to get fixed.  Which leads me to the second part of this post....

Blower Motor Wiring Recall:
The cable is now brown, it's actually 2 RED wires, when good.

The blower motor part is available, but the cars affected by the recall need to be inspected First and given a Repair Order number.  Then when the part arrives they call you to bring the car in.  I was okay with them taking an extra hour to inspect my wires because this means that I am now in line to have the Blower motor/ Wires replaced.  Which is what I wanted.

3 levels of "BAD":
The service representative told me that they have 3 levels of "bad", referring to the burnt wires.  Level 3 means that it's bad, and it should be replaced soon.  Which is what I have.  He told me that I could wait a week to a couple of months for the parts to be available.  Hopefully it won't take that long.  Level 1 and 2 are not very serious damage, which means the wires are not burnt... yet.


Cost for Recalls:  Zero
The cost of the recalls is only my time, which some may say is worth more, but I was okay with it because I got a new Airbag, and hopefully soon a new blower motor/wiring for my car.

Blower Motor Stopped Working: Temp Fix
A couple of days ago I started my car and to my surprise no air was coming out of the air vents.

So I set about to find out what was wrong.

The problem was that the wire got so hot that it burnt the wire terminals and from the heat it became corroded between the terminals to a point that no power was going to the "resistor module" that runs the Blower Motor wires.

Temporary Fix: Please do this at your own risk.
I needed the blower to work no matter what so this is what I did to "temporarily fix" the problem.  Now keep in mind that this is not meant to fix the problem, I did this to my car because I assumed the responsibility of what could happen.  I assume no liability if you do this to your car, please follow this instructions at your own risk.

This fix made the blower motor work again for me.

No association with Websites, they just have the parts I needed:

If you don't want to deal with this, the easier fix is to buy a new Blower motor resistor:Amazon link at the bottom of the article.
www.Amazon.com  They are $40.00 Dollars

Link to Connector, without wire :  Connector replacement Website
www.autohausaz.com  They are $3 dollars


If you want to fix it yourself, do this:...

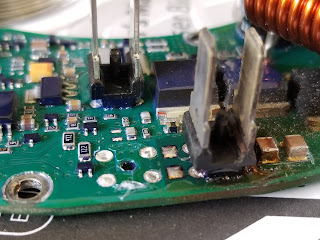
I removed the board "Resistor module" and I found the bad terminals
Burnt Terminal

I unsoldered the terminals... NOT an easy job.


I sanded the PCB board to see PCB terminal connections. to make sure I knew where they were supposed to be connected.
In case I ripped a trace.
Back of Board

Also removed the coating the board had, and the burnt materials, as Burnt material is conductive.
Front of Board


I flipped the connectors, good ones were on the left, so I soldered them on the right
After I cleaned them, I ended up sanding them clean, for a better connection.


Only 3 pins are used, note which, the circled one I did not install because it goes to nothing.


More pics:

Known as "Resistor" module, this is the inside of the module

Burnt Connector on "Resistor Module"

This is the Reason for the Recall
Blower motor Burnt Wire / Connector
Cable is below the Blower motor.


I hope you found this information useful,

See more, to go the main page: Blog Main Page

If you found the information helpful consider donating:


Follow me on Facebook